Under-Desk Cable Management: Trays, Clips, and Sleeves That Work
A practical guide to under-desk cable management: which trays mount best, which clips stay put, and how to plan a clean setup from scratch.

Under-desk cable management transforms a tangled desk into a clean workspace. This guide covers how to plan your approach, which mounting method suits your desk, and how to handle every cable type you will encounter.
We may earn a commission if you buy through our links.
Start With a Cable Audit
Before buying anything, count your cables. Crawl under your desk and list every cable you see.
A typical desk setup includes:
- Power cables for each monitor (1 per screen)
- Display cables: HDMI or DisplayPort from monitor to computer
- USB hub power cable and USB connections
- Laptop charger
- Speaker power and audio cables
- Desk lamp power cable
- Webcam and microphone cables
Most desks have 8-16 cables once everything is counted. Write down your total. This number determines what size tray you need and how many cable ties to buy.
Also note cable paths. Which cables run together toward the same destination? Group these in your head before you start. Cables going to the same place can be bundled and managed as a unit.
Choose the Right Mounting Method
Screw mounting is the strongest option. It works on solid wood desktops, MDF with a solid core, and thick particleboard. Drive the screws into solid material and the tray holds firm under heavy loads.
The limitation is permanence. Screw holes are visible when you remove the tray. If you rent, or want a reversible setup, screw mounting is not ideal.
Adhesive mounting uses industrial double-sided tape or peel-and-stick pads. It works on smooth surfaces without drilling. The limitation is load capacity. Heavy power strips plus thick cable bundles can exceed what adhesive holds over time, especially in warm environments.
For most setups, adhesive is sufficient. If you are mounting a full power strip and five or more thick cables, add a screw or two to support the load.
Clamp mounting grips the desk edge with a clamp mechanism. No drilling required, and it is fully reversible. The limitation is that it works only on the desk’s front or back edge, and the clamp adds visible hardware to the desk perimeter. Best for hollow-core desks like IKEA LINNMON where screw options are limited.
What Goes in the Tray
The tray holds bulky items you want off the floor and hidden from view. Put these in the tray:
- Your surge protector or power strip
- Bundled excess cable length (coiled and tied)
- USB hubs or Ethernet switches
- Laptop chargers when docked
Do not put individual cables through the tray unsecured. Group them with velcro ties first, then lay the bundle in the tray.
What Goes on Clips
Adhesive cable clips mount to the underside of the desk surface and guide individual cables along a defined path. Use them for:
- Routing display cables from the back of the desk to the sides
- Guiding a single cable from the desk surface to a tray
- Keeping monitor cables from dangling behind the screen
Space clips every 8-12 inches on horizontal runs. This prevents cables from sagging between mount points. On vertical runs, clips every 12-18 inches are sufficient.
3M Command cord clips are the most reliable removable option. They come off cleanly and do not damage desk surfaces. Generic adhesive clips work initially but often fall after a few months.
Planning the Route Before You Mount
Lay your cables on top of the desk and trace the path each cable needs to take. Use masking tape to mock up clip positions before committing to adhesive.
Group cables that travel the same route. A power strip usually sits in the center or rear of the desk. All power cables converge there. Route them together.
Display cables typically run from the back of each monitor down to the computer. Bundle left-screen cables together and right-screen cables together. Use separate bundles for power and data, or at minimum run them side by side rather than twisted.
Handling Excess Cable Length
Most cables are longer than your desk needs. A monitor cable rated for 6 feet only needs 3 feet on most desks. Never cut cables. Instead, coil the excess and secure it with a velcro tie. One clean loop takes up minimal space and slides neatly into a tray.
Avoid tight bends. A velcro-secured loop with a 3-4 inch diameter is safe for any standard cable. Kinking a cable at a sharp angle over time damages the insulation and causes failures.
The Installation Sequence
Install in this order for the cleanest result:
- Mount the cable tray first, empty.
- Install all cable clips along planned routes.
- Route cables through clips from the source end toward the tray.
- Group and bundle cables before they enter the tray.
- Coil excess cable length and secure with velcro ties.
- Place power strip and bundles inside the tray.
- Route the tray’s power cable to the wall outlet.
Working in sequence prevents you from needing to move already-installed clips when a cable path changes.
Keeping It Maintained
The main enemy of cable management is adding new devices without re-routing. When you plug in a new monitor or add a USB hub, add it to the cable management system rather than letting it drape over the existing bundles.
Buy a pack of 50 velcro ties at the start. They are cheap and you will use more than you expect. Keep the extras in a desk drawer for the next time you change something.
A clean under-desk setup takes about an hour to plan and install. Done once, it stays clean with minimal maintenance.
Recommended Gear
The products we recommend most often for this kind of setup:
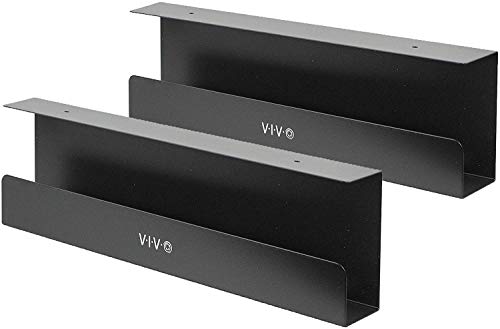
VIVO Under-Desk Cable Management Tray
$37.99 on Amazon (as of Oct 2, 2026) · Price and availability may change. Read our review
3M Command Cord Clips
Prices change often. Check today's price on Amazon.

Velcro One-Wrap Ties
$15.89 on Amazon (as of Oct 2, 2026) · Price and availability may change.
Recommended Gear
Products we've reviewed that fit this guide. We may earn a commission if you buy through our links.


Frequently Asked Questions
- What is the best under-desk cable management tray?
- The VIVO Under Desk Cable Management Tray is the most popular option for good reason. It mounts with screws or adhesive, holds a standard power strip and cable bundles, and costs under $20. For wider desks, the HUANUO cable tray handles more volume at a similar price.
- How do I mount a cable tray to an IKEA desk?
- IKEA desktops are hollow particleboard with a thin HDF back panel. Screw-mount trays need to hit the edge banding or a solid section. The safest approach is using a clamp-on tray that grips the desk edge without screws, or an adhesive mount on the underside near the back edge.
- Can I use adhesive cable clips on painted walls?
- Yes, but use removable adhesive versions rather than permanent ones. 3M Command strips work well for light cable management. Permanent adhesive clips leave marks or damage paint when removed.
- How do I deal with cable slack under a desk?
- Coil excess cable length and secure with a velcro tie. Place coils inside a cable tray or box. Don't fold cables sharply as this damages the insulation over time. A gentle loop held with a velcro tie is the right approach.
Related Guides

Best Cable Management Solutions for Your Desk in 2026
The best cable management products for your desk in 2026: trays, spines, clips, and sleeves. Covers under-desk and standing desk solutions.

IKEA Cable Management Guide: SKADIS, FIXA, and DIY Tricks
How to manage cables on an IKEA desk setup using SKADIS pegboards, FIXA cable clips, and popular third-party additions. Budget cable management that actually works.

How to Cable Manage a Standing Desk: Spine, Tray, and Velcro Method
Step-by-step guide to cable managing a standing desk so cables don't drag or tangle when the desk moves. Three methods covered for different budgets and setups.

Adjustable Standing Desk Buying Guide: Frame, Surface, and Motor
A practical buying guide for adjustable standing desks covering frame types, motor specs, tabletop materials, and what to skip. Updated September 2026.
Setup Inspiration
All setups →
Clean Standing Desk Setup with Zero Visible Cables
How I eliminated all visible cables from my standing desk setup using a cable spine, under-desk tray, and velcro. Full product list included.
Total: $850

FlexiSpot Standing Desk Setup: Build Guide and First Impressions
A detailed look at building a home office around the FlexiSpot E7 standing desk, including cable management, monitor arm setup, and what surprised me.
Total: $1,020

My Standing Desk Home Office Setup for Full-Time Remote Work
A full-time remote work home office setup built around a FlexiSpot E7 standing desk, dual monitors, and clean cable management. Total cost: $1,650.
Total: $1,650